This post may contain affiliate links, which means I’ll receive a commission if you purchase through my links, at no extra cost to you. Please read my full disclosure for more information.

Have you ever wanted to start a WordPress blog before? But the fear that you won’t be able to set it up correctly overwhelms you? I know I did!
However, the thing I regret the absolute most in my first year of blogging is not starting my blog sooner!
If you’re in the same boat as I used to be: have no fear! I am here to help you and walk you through the steps of starting a blog!
Before we get into the blogging set up breakdown, I just wanted to mention there are many reasons to start a money-making blog.
Besides the potential of earning an income that surpasses anything you’ve ever made before and even eventually reaching financial freedom with your blog, here are other reasons you should consider blogging:
- You can work from anywhere and at any time of the day
- You gain experience in many fields (marketing, SEO, connecting with brands, bloggers and entrepreneurs, opening online stores, etc.)
- It’s a creative outlet
- It’s actually really fun
- You learn something new every single day
- There’s always new things to learn, write about, and ways to make more money on your blog
You might want to start a personal blog or a blog for a big outreach, a blog in which you can share valuable content, your services, your products, or even a blog making you money through advertising, affiliate marketing, and many other streams that we’ll discuss at the end of the post.
For some bloggers, it is a supplementary source of income, for others, blogging is their full-time job! How amazing is that!
Working from home and on your own time?! That’s why I signed up! It was a way to combine my love of writing with a way of earning money from the comfort of my bed, I mean couch.
Although my blog is no where near those 5to-6-figure making blogs, I do believe in my content and the consistent work I’ve been putting in.
The bloggers that inspired me to start my journey are the following but not limited to:
- Anastasia from anastasiablogger
- Arfa from shemeansblogging
- Sophia from bysophialee
- Michelle from makingsenseofcents
- Ruth from ruthsoukup
Furthermore if you want money on your website, you need to sign up with a self-hosted blog. You don’t want to start with a free blog or free WordPress because you won’t be allowed to make any money on them and your readers won’t want to buy from a site that’s not self-hosted and not secure.
For the sake of this tutorial, I will show you how to install the cheapest self-hosted WordPress site using Bluehost as the hosting platform and domain provider!
Without further ado, this is your step by step guide on how to setup a WordPress blog and make money blogging in 2021! 💻
There are 7 elemental steps to set up your money making blog:
- Decide your blogging niche
- Pick your domain name
- Pick a host for your blog
- Install and start your WordPress blog
- Design your website
- Get writing or should I say blogging!
- Monetize your blog
1. Decide your blogging niche
The first step is to decide your blogging niche! I would recommend to make it as niche down and as specific as you possibly can in the beginning.
Some questions you should ask yourself before starting a blog are:
- Who is my target audience? E.g., what is the gender, age, occupation, etc.
- What is my mission? Do I have a mission besides making money? E.g., do you want to inspire? Do you want to educate? Do you want to entertain? Do you want to share reviews?
- What are my interests? What do I like writing about?
The best advice I can offer you is to blog about something you have a lot to say. Essentially, something you love researching and blogging about. Or else, you risk running out of things to write about. Or worse, you risk your readers knowing that you are not passionate about the topics you write.
Also, you should try to make it as specific as possible for others to be able to find you.
Simply having a money blog, health blog, travel blog, are way too general as a topic. Your singular voice is competing with the already established bloggers in these high-earning niches. You can perhaps make a money blog for single mothers. Or a health blog for busy college students. As a result, you will attract your specific target audience.
Here are some of the money making niches in the blogging world:
- Finance blogs
- Fashion and beauty blogs
- Blogging blogs
- Marketing blogs
- Travel blogs
- Health and fitness blogs
- Food blogs
- Relationship blogs
- Mom blogs or parenting blogs
- Pet blogs
- DIY blogs
- Lifestyle blogs (such as a university blog)
I’ve also seen some quite successful book blogs!
My blog is in a broad niche therefore it falls under a lifestyle blog. Lifestyle blog do well but again you need to refine your message to attract a specific audience since you are competing with millions of established lifestyle blogger.
My tag line for my lifestyle blog is “self-help made easy” with a focus of individuals navigating their 20’s (university, student loans, establishing careers, establishing good health and money habits for their future, etc.)
2. Pick your domain name
Brainstorm domain names
Now that you’ve picked out your blogging niche, it’s time for you pick out your domain name and start your WordPress blog.
Picking out a domain name might take you a few minutes. When I first started, it took me a whole day and a half to be satisfied with my domain name. (It has a little play on words that we call ‘alliteration’ in literature because both words start with the same word ’s’; Sandra’s Shelf.)
With blogging names, you can honestly make it as quirky or specific as you want. Some people like to use keyword combinations of their blogging niche. As of late, I find this quite tricky because most of the high volume keywords are already taken on the blogging platforms and if not, on other social media platforms.
And so for this step, you need to brainstorm a little! You’ll get there, I promise!
First, grab a notepad and scribble down name ideas and keywords combo. Then, come up with as many ideas and names as you can. Then try to pinpoint which one has more of a meaning and relevance to the blog you envision starting. To do so, think of your tagline.
My tagline is ‘self-help made easy,’ and this self-help tips are coming from my shelf and my experiences, therefore blog’s name Sandra’s Shelf.
It’s safe to say that a lot of people like to use their name + their niche. Or they use their full name because they know it will be available on every platform. Using your full name can make it more personal to your readers and subscribers, because then they know you are a real person and that you are being transparent.
However, I’ve seen bloggers with made up last names and that actually works too! You never know sometimes your full name is actually taken by someone else on Facebook or instagram.
Personally for me I didn’t want to use my full name because I already had a domain dedicated to my full name and I use that domain name for my writer’s profile when I’ll self-publish my books in the future.
Check domain availability
Now that, you’ve found your domain name, here comes the second hard-ish part. You then need to check to see if your domain is available under the ‘Domain’ search bar.
You can use the Bluehost domain name checker (linked here):

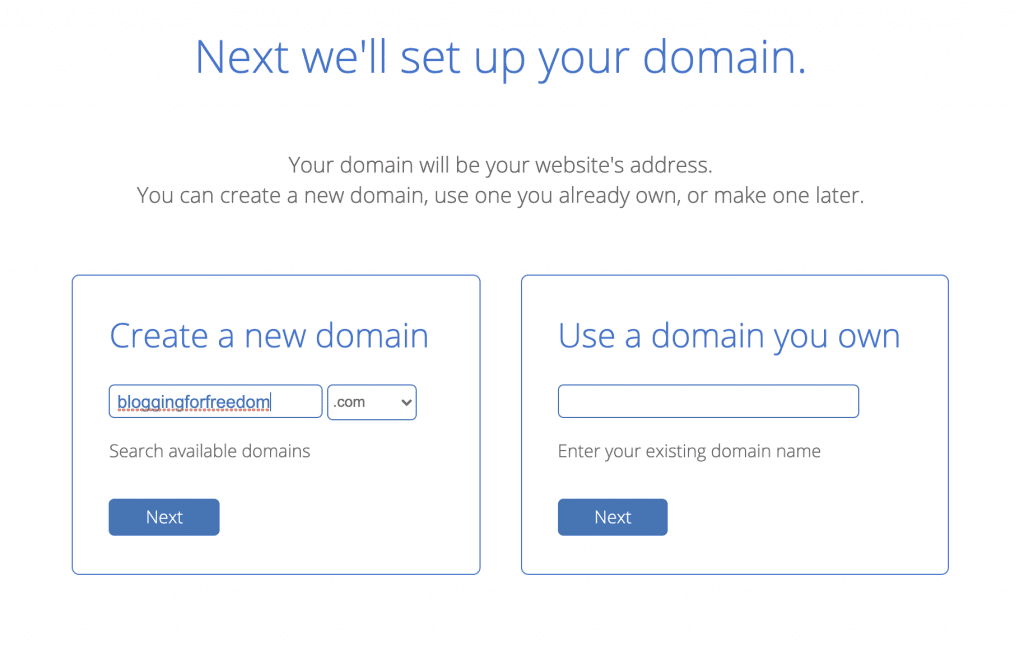
Remember always use “.com.”
A quick word about domain names: you own your domain name because you pay annually for it’s renewal on a hosting platform.
If you ever wanted to sell your blog, keep in mind using your own name will be hard to do so.
Furthermore, the simpler it is for your readers to type in your domain name, the better. Don’t use hyphens (-) or numbers (1,2,3) on your domain because you won’t it to be searchable and accessible, as well as easy to find on Google.
Plus, make sure your domain name end with “.com” since “.com” is the recommended for every website. Otherwise, readers might ignore shopping or browsing on your blog since “.com” is the most reputable worldwide.
Back to your domain name, try to keep it as short-ish and to the point as possible. Longer domain names might be harder to convert onto social media platforms if you wanted to make a Twitter, Instagram, YouTube, Tik Tok, etc. with the same name as your username.
Therefore, also check those platforms beforehand if they are available to use with your name and secure (by opening) accounts on these platforms as soon as you make your purchase of your new domain name.
3. Pick a host for your blog
What is a blog hosting?
Your web hosting is essentially where your domain (blog) will live, i.e., be hosted. For e.g., my domain (sandrasshelf.com) is hosted on Siteground.
What is the cheapest hosting for beginners?
Blogging is amazing because compared to most businesses, it has a low risk start with a high reward outcome (as long as you give your time and dedication to keep blogging). You invest so little oppose to a physical business that requires thousands of dollars in investment, big bank loans, and etc.
You can start your blogging business as low as $2.95 a month with Bluehost!
When I started my blog, I jumped into the first plan I saw because I was impatient and ready to go, go, go. For the sake of transparency, I need to mention that I started my blog with the Go Geek Plan (the most expensive plan of three) with Siteground. You can access Siteground plans here.
There is absolutely nothing wrong with Siteground! They are actually amazing! Their customer support is amazing and I never encountered any downtime with my website. But like I said, as a newbie blogger it was a big investment.
Whichever plan you chose, know that you can always change and upgrade your plan. So you can start cheap and once you make money, you can go bigger.
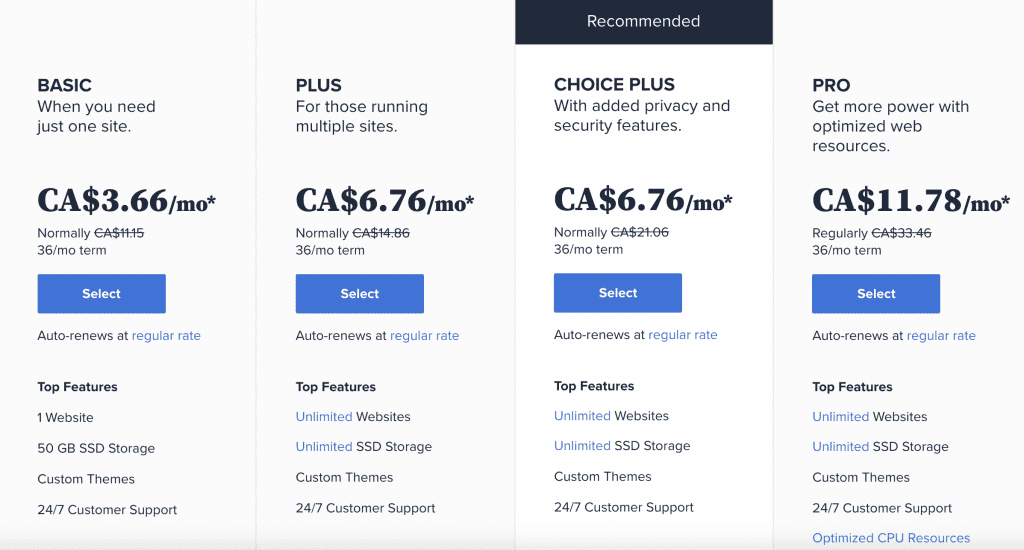
For newbies, it is highly recommended to start with Bluehost because they are super affordable. Their lowest plan starts at $2.95 USD per month!!! ($3.66 CAN) Plus, you will also get a FREE domain name with your hosting plan.
However, I do strongly recommend adding the “domain privacy” option to your plan. Every blog should have a domain privacy. Why? Because domain privacy keeps your personal information out of the public access, personal information such as your address, your sign up email address, your phone number, etc.
How to set up Web Hosting?
Follow this link: bluehost.com and click on “Get Started.”
Select the “Basic plan,” the first plan out of the offered plans. (Remember, you can always upgrade your plan as needed.)
Then, you can yo use the “.com” domain name you found on the previous step. Create a new blog with that domain name. Make sure its “.com”!
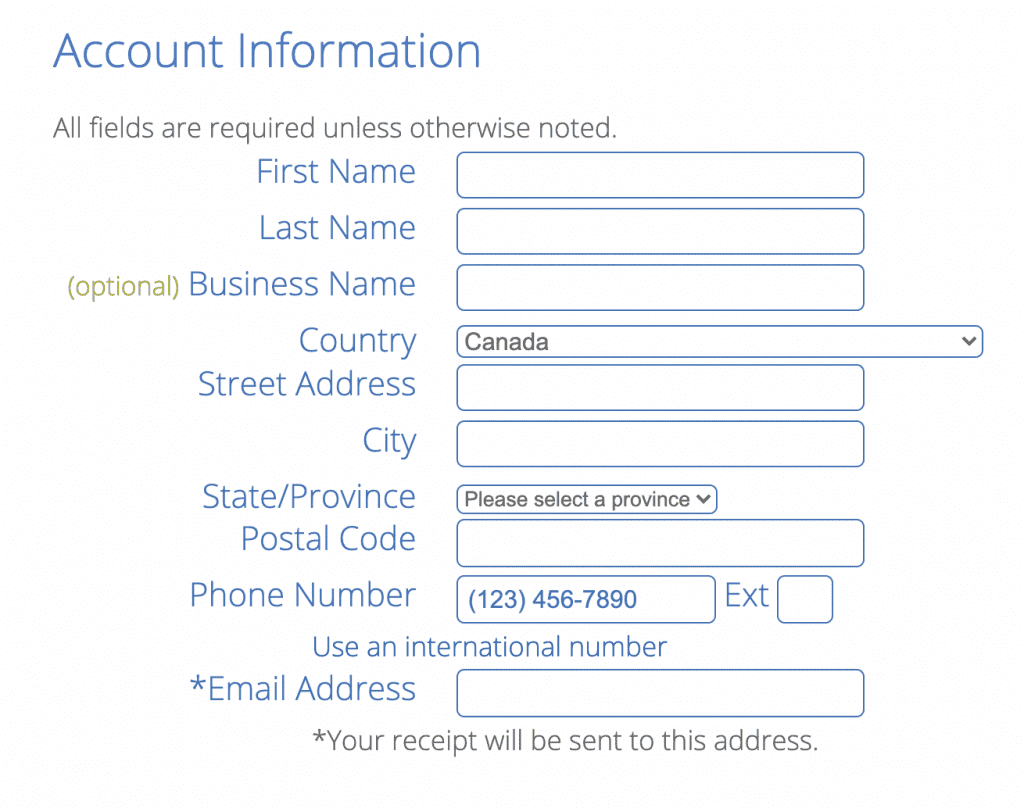
Then, fill in all of your personal information correctly!
Then, submit your payment.
And voilà congratulations! You now own a self-hosted blog! But the fun doesn’t end there…
4. Install and start your WordPress blog
After this is done, you need to install WordPress (one of the most reputable blogging softwares out there). Plus, when you buy hosting, the WordPress software is included for free.
You will have a prompt telling you how to “Install WordPress” directly on Bluehost. (The same goes for Siteground if you decided to go with Siteground.) Just follow those simple easy steps through the guide!
After installing WordPress with your domain name, you will have to create a WordPress admin log in with your personal email and a password.
5. Design your WordPress site
Here comes the fun stuff!
Log into your WordPress site, you will be able to access it’s back end, your “Dashboard.” In this dashboard you’ll be able to design your blog, install plugins and themes, as well as create pages and posts, and many more options.
The first thing you’ll have to do on your site Dashboard, is select a free WordPress theme.
The ‘Themes’ are located under “Appearance” in your WordPress dashboard.
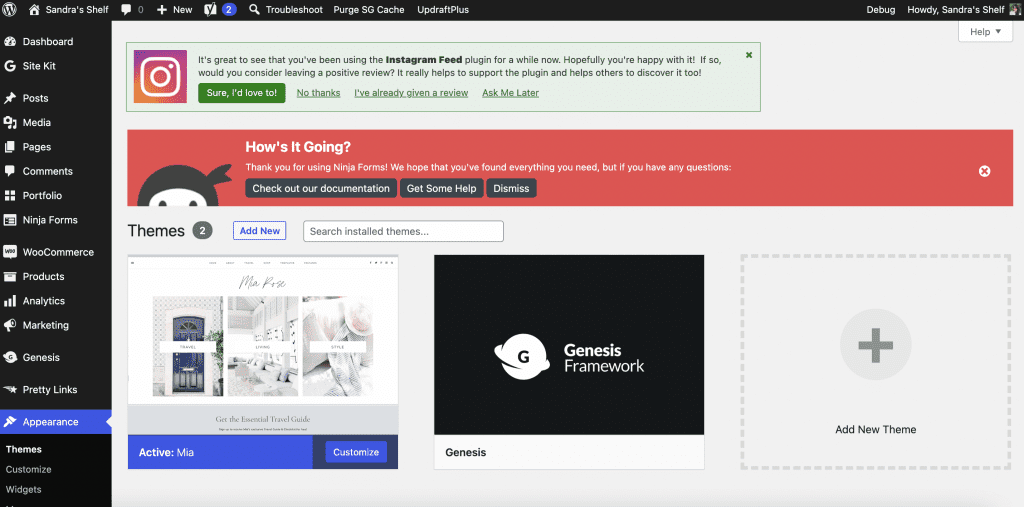
There are a bunch of WordPress free starter themes. I mainly started with the Astra theme. Then, I used the ‘Plugins’ “Elementor” and “Envato” add-ons to tweak and change some of my website pages.
Additionally, ‘Plugins’ add functionality and further design to your blog. There are so many free plugins available on WordPress! If you want more functionality from these plugins, you have to pay a subscription.
Although these free options served me during the first few months of my blog, I came across many customization hurdles and limitations on my blog. No matter how many free plugins I added to my website, I didn’t have the look and final functionality I wanted on my site. Plus, I risked my site’s speed in order to do everything for free.
Another thing I might add, it can be very easy to mess up your website if you truly don’t know what you’re doing. It happened to me at least twice when installing different codes and plugins by myself on my website and it just changed everything.
Luckily, I had a backup and could restore back to my original look. But that’s why from here on out, anytime I make a new WordPress site, I’ll definitely right away pay for a WordPress theme!
So, if you want to save yourself the hassle and the very longs of figuring out and building everything by yourself, you should purchase an affordable WordPress theme. It’s a one time purchase that saves you hours of frustration and it will help keep people on your site because a) your site looks professional from the start b) you have a bunch of functionality and c) you don’t compromise your site’s speed.
What do I recommend?
I highly recommend buying a theme from 17th Avenue Designs!
Why?
They’re super affordable compared to the $1000 theme designs out there!
Their themes are absolutely beautiful. They have many different templates and they’re all super affordable ranging from $49 to $99 for their latest design called Clover.
I have the MIA theme on my website and I am absolutely in love with it, no joke.
As soon as I made the switch on my blog, things became super easier. The 17th Avenue Designs themes come with highly detailed step-by-step instructions for set up.
You can upload the theme with or without content present on your website! It’s obviously going to be easier when your website is brand new because you don’t have to adapt the them to the content you already have on your website, so keep that in mind. I did the switch when I had 90 blog posts so it took me a bit more time to execute but I, in no way, lost any of my content thanks to 17th Avenue Designs comprehensive step-by-step instructions.
If you’re too scared or in a hurry to get things up and running, you can pay extra for them to install the theme for you!
You can browse 17th Avenue Designs themes here.
6. Get writing or should I say blogging!
There are many different opinions on how many blog posts you should launch your blog with. I personally wanted to launch my blog with 20 blog posts but I got overexcited and so I started with 10 and worked my way to 20 and so forth.
You can advertise your blog posts for free practically everywhere: Twitter, Facebook, Instagram bio, Tik Tok, Pinterest, Quora, etc.
The most important thing to a blogging business is dedication in your time and consistency. I will be making separate blog posts on how to write an effective blog posts but for now I would highly recommend for you to stick through a consistent blogging schedule!
I try to – at the best of my ability – to write 3 blog posts a week of at least 1500 words, resulting anywhere between 12 to 15 blog posts a month!
Some bloggers say that when you are starting out, it’s always better to have a high volume of content with lesser words. Because you can always go back and edit them to add more words and valuable information.
Additionally, you want your information and content to be updated every so often. Especially if your posts are a “how to guide” (like this one).
As I said, I will be writing a separate blog post on how to write a successful blog post as well as the different types of blog posts that perform well on blogs. So look out for those posts!
7. Monetize your blog
Before you even think of making any semblance of money on your website, you MUST with no exception have legal disclaimer pages on your website!
This step doesn’t have to be overwhelming at all. You don’t even have to crate yourself and you don’t have to spend a grand on a lawyer to write you one! Actually, you can set up your blog’s legal disclaimer pages in just 30 minutes tops! How? All you need to do is follow my guide here.
SEE ALSO: How to Legally Protect Your Blog Under 30 Minutes
So how do bloggers make money?
You could make money blogging by:
- Including ads on your site (with Google Ads, Ezoic, Adthrive, Mediavine, etc.)
- Writing sponsored posts
- Selling digital products (eBooks, online courses, printables, etc.)
- Promoting affiliate products (Amazon, Shareasale, Shopstyle, Clickbank, Bluehost, etc.)
- Selling a service (1-1 coaching, mentoring, auditing, etc.)
If you are a completely new blogger, some affiliate programs such as Amazon Associates accept new blogger applicants. However, in the next 180 days you need to make at least 3 qualitative sales if you want your store to remain open. And I’m telling you from experience, it might be hard if you don’t have any traffic coming to your blog.
But you can always work on your traffic and producing more content in order to ensure to make those sales. Always read the agreements and disclaimer to any affiliate or advertising program you sign up for.
As for advertising companies, they all have their special requirements for you to be able to join and be approved in their program. Always do your research first. The easiest one to get into is Google Ads once your website is up and running but it doesn’t yield as high rewards as other advertising companies.
In summary, there are a lot of ways of making money on your blog. I would recommend you work on building great content and a readership primarily before monetizing because then you won’t have anyone buying.
I hope you enjoyed this blog post on how to setup a WordPress blog and make money blogging in 2021! Have you started a blog post in 2021? Did you find it challenging? Let me know in the comments! Let me know what other blogging guides you’d like to read and learn from! 😊




This is a great article. I have a WordPress blog and still new at it. I learned quit a bit from your article. Thank you for such a great article.
I am glad it could help! 😊
Excellent point about the lifestyle blog. As I also have a lifestyle blog http://sensiblyshelley.com/ I agree that you have to refine your message. Also, I use Word Press and am very happy with them.
You have covered it in a detailed manner with a great chronology. So useful for someone starting up.
I would come back to different posts for sure!
Thank you! I am so glad you think so!
This was really informative!
Great info for new bloggers!
Only wanna remark that you have a very nice web site, I enjoy the design it actually stands out.
Look into my page Ketorol
I am in fact delighted to read this weblog
posts which includes plenty of valuable facts, thanks for providing such data.
Also visit my blog; Viking XL Keto BHB
Excellent blog right here! Additionally your web site a lot up fast!
What host are you the use of? Can I get your associate link for your host?
I want my site loaded up as fast as yours lol
Look at my web site Optimum Keto Diet
Yes of course! I use Siteground (click the link 🙂 ) They’re amazing!
Wow! Awesome article!
Make money review
Thank you!